Student Guide
Document Version: 2020-12-09
Copyright © 2025 Network Development Group, Inc.
NETLAB+ is a registered trademark of Network Development Group, Inc.
VMware is a registered trademark of Broadcom, Inc.
Cisco, IOS, Cisco IOS, Networking Academy, CCNA, and CCNP are registered trademarks of Cisco Systems, Inc.
Introduction
This is the NETLAB+ Student Guide for the virtual edition of NETLAB+. The first section will take you through the initial login process, including changing your initial password and your user settings.
We will also take a look at the MyNETLAB interface and how to make changes to the user settings made during your initial login.
Step-by-step instructions for scheduling a lab reservation are provided. We will show you how to access the scheduling feature on the MyNETLAB page, select a lab from the lab listing, and the features of the Pod Scheduler.
Finally, we will explore the lab access interface and provide guidance on performing a lab session and accessing lab devices.
[]Initial Login
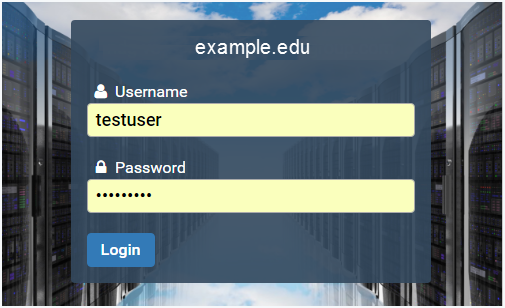
Your instructor or NETLAB+ Administrator will provide you with the URL or IP address of the NETLAB+ system you will use, along with a username and password.
To access the login page, open a web browser and type in the URL or IP address of the NETLAB+ system. Using the most recent available version of the browser you select is recommended. NETLAB+ has been tested with the web browsers listed in the table below.
Browser |
Minimum Version |
Support/Experience |
|
|---|---|---|---|
|
Google Chrome |
54.0 |
* * * * * |
|
Mozilla Firefox |
46.0 |
* * * * |
|
Apple Safari (MAC only) |
11.0.3 |
* * * * |
|
Microsoft Edge |
40.15063.674.0 |
* * |
|
Microsoft Internet Explorer |
No longer supported |


Enter your Username
 and Password
 into the fields in the login box and
then click the Login button. The graphics on the page may be
different from the example shown below. You will be prompted to
change your initial password; see the next section for details.
into the fields in the login box and
then click the Login button. The graphics on the page may be
different from the example shown below. You will be prompted to
change your initial password; see the next section for details.
[]
Change Password During Initial Login
During your first login, you will be required to change your password after you successfully provide your username and initial password. NETLAB+ enforces strong passwords.
Passwords must meet the following requirements:
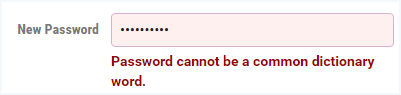
Not found in the common dictionary and not too simple
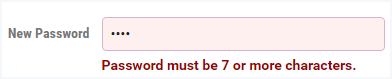
7 or more ASCII characters
Contain both numbers and letters
One strategy you may find helpful in selecting a new password is to combine a word together with numbers. For example, you could not use the word “airplane”, but you could use “airplane789”. You may not reuse your initial password.
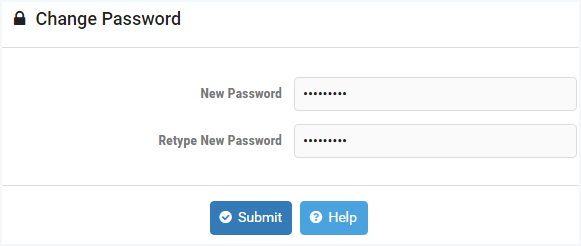

Enter your selection into the New Password field**.**
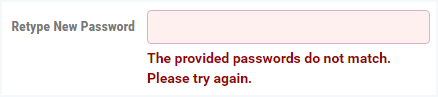
Enter the password once again in the Retype New Password field and then click Submit.
Examples of typical password errors:
The error message shown below indicates that the password entered did not meet the minimum length requirement.
The error message shown below indicates that the new password entered is a simple word found in the common dictionary and therefore not eligible to be a password on the system.
If the values in the two password fields do not match, an error message will be displayed, similar to the one shown below.
[]Change E-mail Address During Initial Login
The next field you will be prompted to enter is your E-mail Address. This field may already contain a value if an e-mail address was entered at the time your account was created. You may edit the e-mail address if needed. Entering an e-mail address is optional.
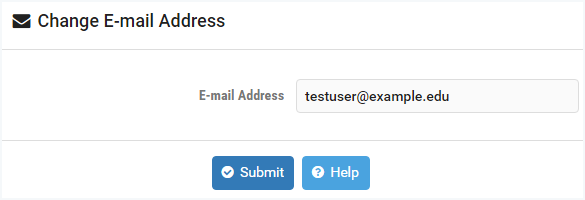
Update the E-mail Address field as desired and click Submit. The e-mail address must be in a valid format (example, username@domain.xxx); otherwise, an error message will be displayed.

[] Change Date and Time Settings During Initial Login
Next, you will select your local time zone and your preferences for dates, times, and calendars. These settings are especially important to ensure that information is displayed accurately when using the scheduler.
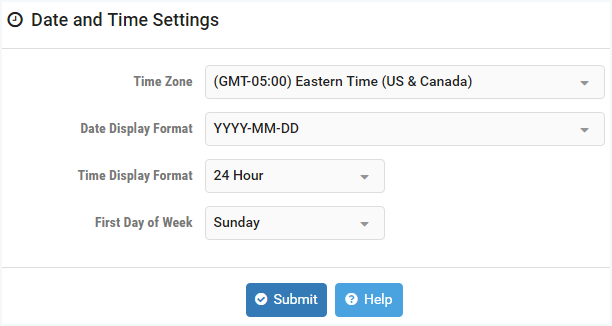
Select the Time Zone where you are located. NETLAB+ will adjust for Daylight Savings Time.
Choose the Date Display Format you prefer. This is the style that dates will be displayed (for example, YYYY-MM-DD).
Select the Time Display Format. Time may be displayed in 12-hour (AM/PM) format or 24-hour format.
Select the First Day of the Week to be shown in the scheduling calendar. Sunday is the default.
When you are finished making any necessary modifications, click Submit.
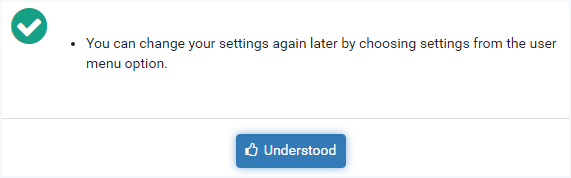
As noted in the message displayed, these settings may be changed as needed. Click Understood.
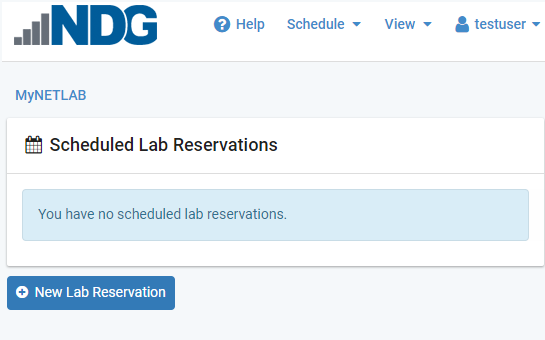
The MyNETLAB page will be displayed.
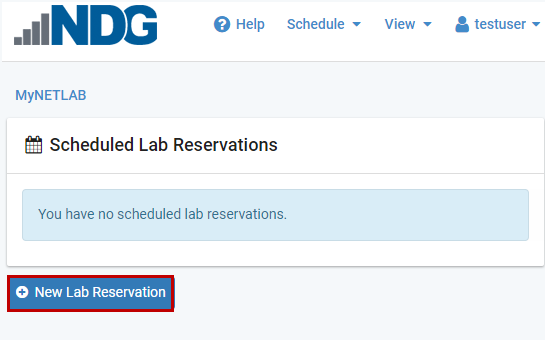
[]MyNETLAB Interface
After a successful login, the MyNETLAB page will be displayed. Any scheduled lab reservations will be displayed here. If this is your first time logging into the system, it is likely that there are no scheduled lab reservations to display (unless a lab reservation has been made by your instructor).
[]Modify User Settings
The settings you made during your initial login may be modified any time, as needed.
To access the Settings page, click your username in the top-right corner and select Settings.
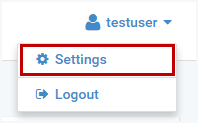
The Settings page will display your current user settings.
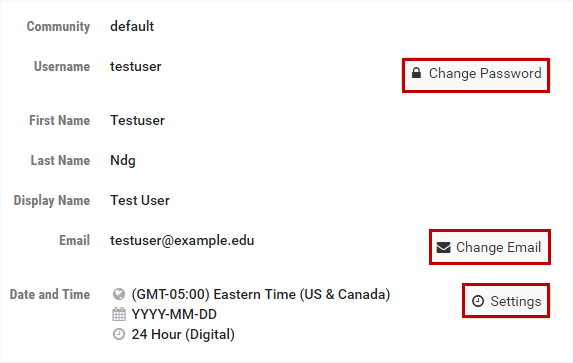
The Change Password, Change Email, and Settings buttons may be selected to update the information displayed.
[]Change Password
Click the Change Password button on the Settings page to display the Change Password page.
Passwords must meet the following requirements:
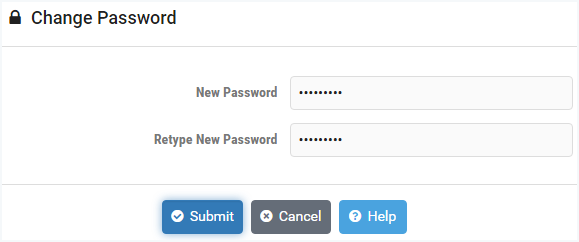
Not found in the common dictionary and not too simple
7 or more ASCII characters
Contain both numbers and letters
Enter your selection into the New Password field**.**
Enter the password once again in the Retype New Password field.
To proceed with updating your password, select the Submit button. You will return to the MyNETLAB page. (Or, if you decide that you do not want to change your password, you may select the Cancel button to return to the MyNETLAB page with your password remaining unchanged.)
[]Change E-mail
Click the Change E-mail button on the Settings page to display the Change E-mail Address page. Entering an e-mail address is optional.
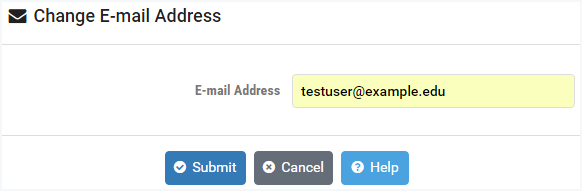
Update the E-mail Address field as desired. Click Submit to save changes and return to the MyNETLAB page. (Or, select Cancel to return with no changes made). The e-mail address must be in a valid format (example, username@domain.xxx); otherwise, an error message will be displayed.
[]Change Date and Time Settings
Click the Settings button on the Settings page to display the Date and Time Settings page. These settings are especially important to ensure that information is displayed accurately when using the scheduler.
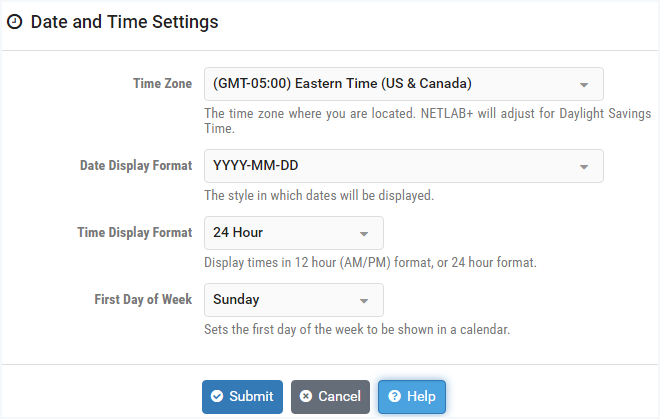
Select the Time Zone where you are located. NETLAB+ will adjust for Daylight Savings Time.
Choose the Date Display Format you prefer. This is the style that dates will be displayed (for example, YYYY-MM-DD).
Select the Time Display Format. Time may be displayed in 12-hour (AM/PM) format or 24-hour format.
Set the First Day of the Week to be shown in the scheduling calendar.
When you are finished making modifications, click Submit. The MyNETLAB page will be displayed. (Or, to return to the MyNETLAB page without saving changes, click Cancel.)
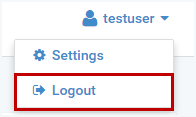
[]Logout
The Logout link is used for logging out of the NETLAB+ system.
Click your username in the top-right corner of the MyNETLAB page and select Logout.
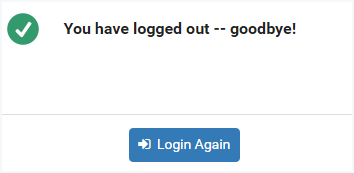
A confirmation message will display, select the button if you want to Login Again and return to the login screen.
[] Schedule Lab Reservations
This section provides step-by-step instructions for scheduling a lab reservation using the virtual edition of NETLAB+. We will show you how to access the scheduling feature on the MyNETLAB page, select a lab from the lab listing, and the features of the Pod Scheduler.
To schedule a lab reservation, log in to NETLAB+, and select the New Lab Reservation button on the MyNETLAB page.
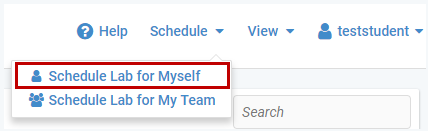
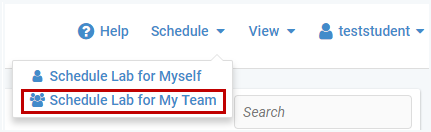
Alternatively, you may select the Schedule option on the MyNETLAB page. You will have the option to schedule a lab for yourself or to share as a team.
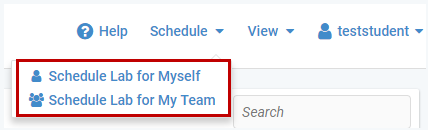
[]Schedule a Lab for Yourself or for Your Team
You may choose to schedule a lab for yourself or to share as a team that you have been assigned to by your instructor.
If you choose the Schedule Lab for Myself option, access to the lab reservation will be available only to you and the lead instructor of your class.
If you choose the Schedule Lab for My Team option, access to the lab reservation will be available to all members that have been assigned to your team and the lead instructor of your class.
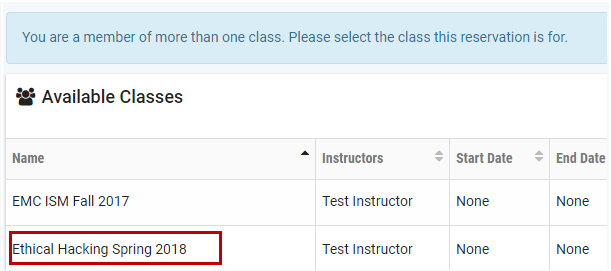
[]Select a Class
If you are enrolled in more than one class, you will select the class from the list of Available Classes.
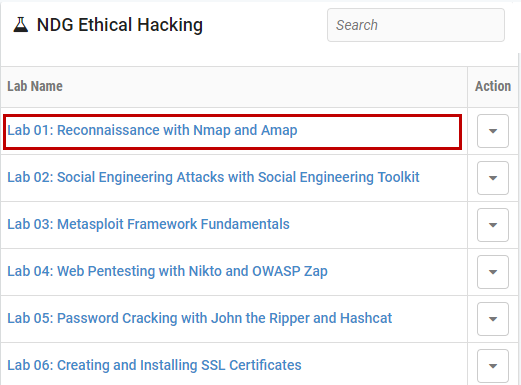
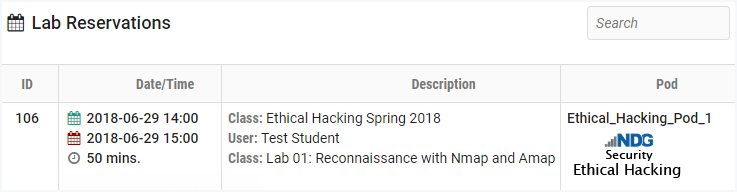
[]See a List of Labs
A list of the labs associated with the class will be displayed. In this example, the student is enrolled in an NDG Ethical Hacking class.

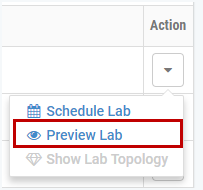
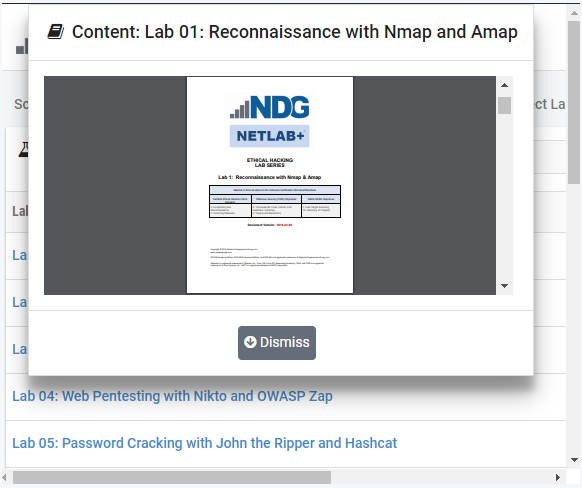
[]Preview Lab Content
To see a preview of the instructional material associated with a lab, select Preview Lab on the Action dropdown at the end of the lab list row.
The content will be displayed. The options available to zoom the view, download, and print the content will vary, depending on your browser settings. Click Dismiss when you are finished previewing the content.
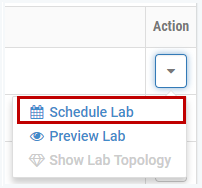
[]Enter the Pod Scheduler
To schedule a lab session, click the Lab Name.
The scheduler may also be accessed by selecting Schedule Lab on the Action dropdown at the end of the lab list row.
[]Explore Pod Scheduler Features
The Pod Scheduler will be displayed, allowing you to schedule a lab reservation for the selected lab.
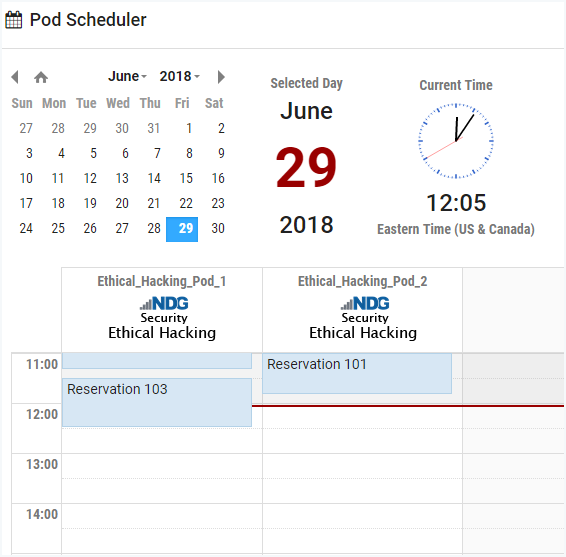
Pod Scheduler Features:
Calendar: Use the calendar in the upper-left corner to select the date for the reservation by clicking on the date of your choice. You may scroll from month to month by selecting the
 and
and
 buttons. Select the
 button to reset the selected day to
today’s date.
button to reset the selected day to
today’s date.
Selected Day: The day selected on the calendar is shown here. It is initially set to today’s date but can be modified by making a new selection on the calendar.
Current Time: Displays the current time, according to your time zone settings. The time may be displayed using 12-hour or 24-hour time, depending on your settings.
Schedule Table: The columns of the table show the pods available to you for scheduling the selected lab. The number of pods available will depend upon the number and type of pods that have been installed on your NETLAB+ system. Consult your instructor or NETLAB+ Administrator if you have questions about the pods available to you. The rows of the table show reservation times. The solid red line indicates the current time.
[]Select a Reservation Time
To select a lab reservation time, scroll the table as needed to display available time-slots. The time-slots below the red line (current time), may be selected if available.
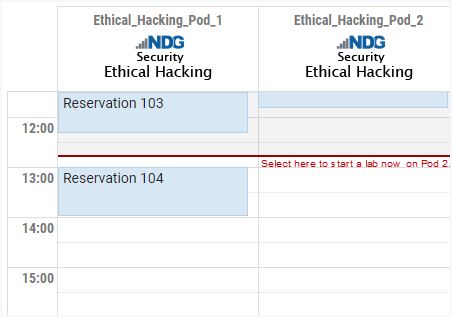
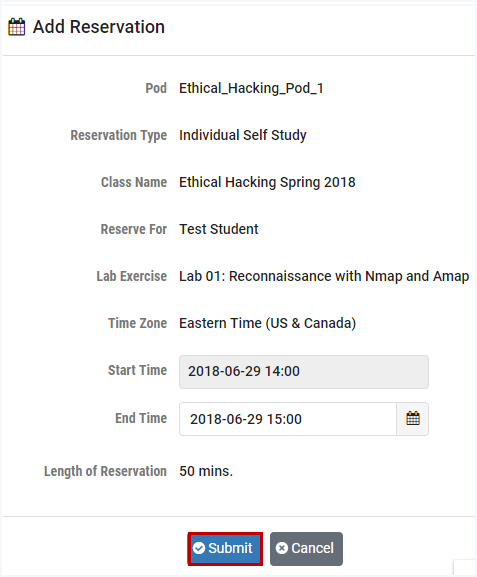
Select a lab reservation time on a pod by clicking the appropriate box for the time-slot. Details of the lab reservation are displayed. Review the reservation details, including changing the End Time if needed (see picture below), and then click Submit.
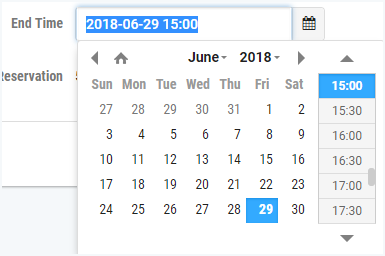
The End Time may be modified by clicking the End Time field and selecting a new time on the popup calendar (subject to pod availability and whether the Time Limit is set to be enforced for the class).
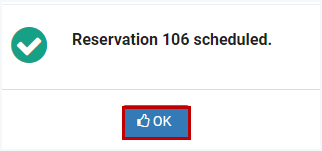
A confirmation message will display. Select OK to return to the MyNETLAB page.
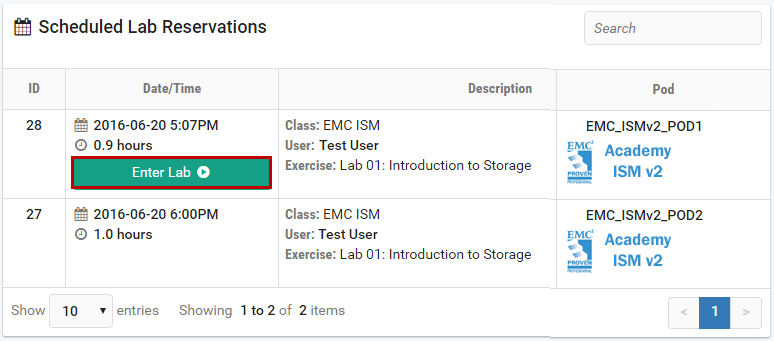
[]See the Lab Reservation Displayed on the MyNETLAB Page
The reservation is now shown in the list of Lab Reservations.
[] Enter a Lab Session
At the scheduled time of a lab reservation, the Enter Lab button will display. Select the button to enter the lab and display the lab access interface.
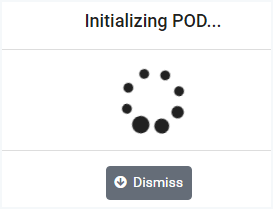
You may see the Initializing POD indicator displayed on the page at the beginning of your session. This indicates that NETLAB+ is in the process of initializing the lab devices in the pod to prepare them for use. Allow the initialization to proceed.
[]Explore the Tabbed Sections of the Lab Access Interface
The lab access interface is divided into several tabbed sections. The Topology, Content, and Status tabs provide access to NETLAB+’s functions. Additional tabs provide access to the devices in the pod (devices included in pods vary).
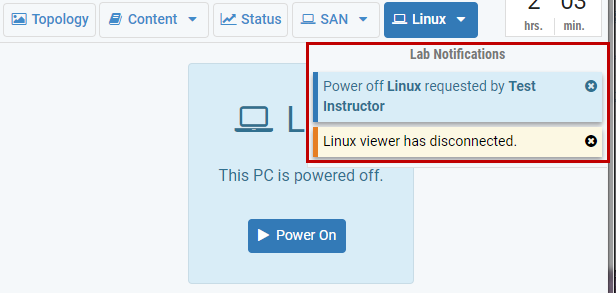
As you perform different actions throughout your lab session in any of the tabbed sections, you will see Lab Notifications displayed in the right corner, below the Time Remaining Indicator. Most messages are set to display only briefly.
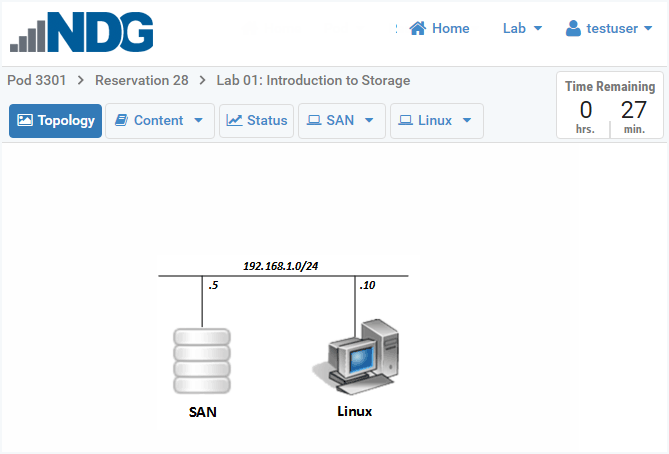
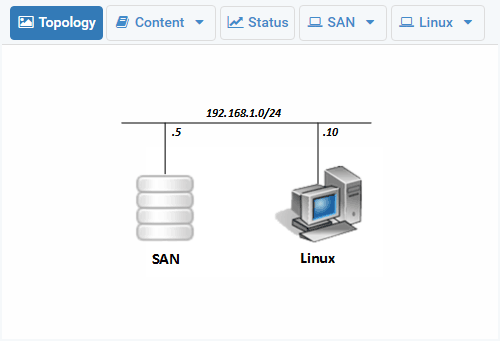
[]Topology Tab
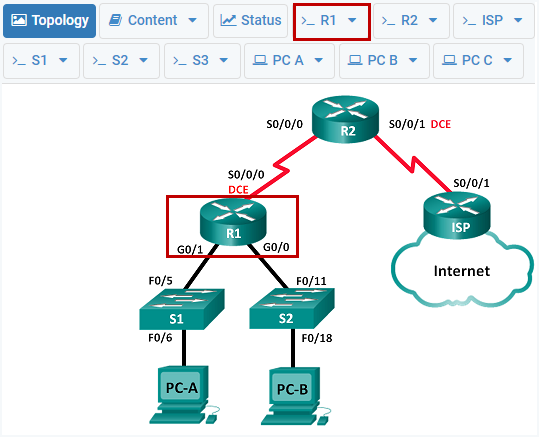
The Topology tab displays the lab topology, including the IP addressing scheme and physical or logical connections.
In this example, the topology diagram shows two devices: a SAN and a Linux machine.
[]Content Tab
The Content tab displays the lab content, the instructional material associated with the lab.
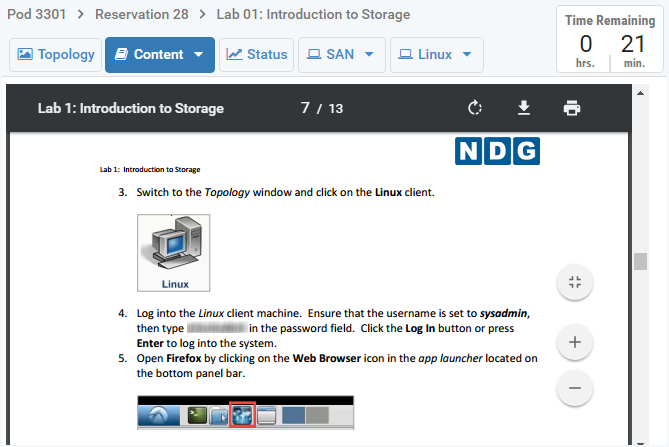
You may see options to rotate the display of the content, download, and print. The options available will vary, depending on your choice of browser and your browser settings.

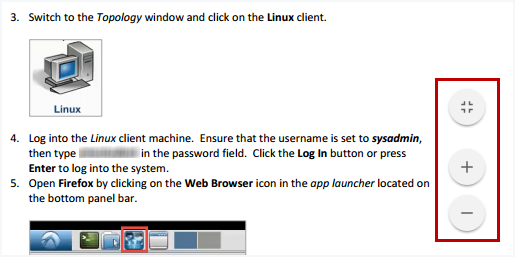
To adjust your view of the content, you may see buttons to toggle the content display between Fit to Width/Fit to Display and Zoom in/Zoom out. (These options will vary, depending on your browser selection and browser settings.)
Configure the Browser to Display Content
If your browser is not configured to view PDF files inside the browser, the content will not be displayed. Instead, you will see a message similar to the screen shown below.
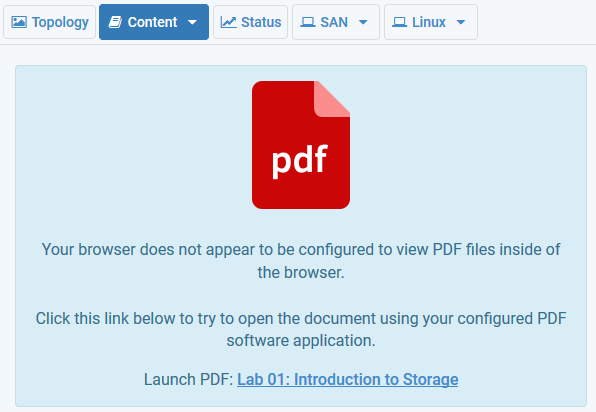
You may launch the PDF in a separate window by clicking the link. But, if you would like to configure your browser to display the PDF, you may do so by following the steps below. For this example, we will configure the Firefox browser. The steps required to configure your browser will vary, depending on your selection of browser and browser settings.
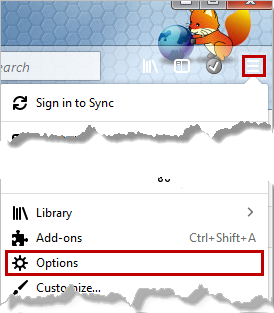
Open the Firefox menu and select Options, which will open in a new browser tab.
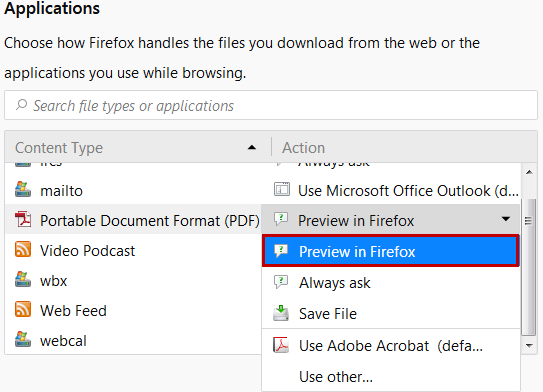
Scroll down the Options page and locate the Applications section. Select the Content Type of Portable Document Format (PDF) and set the Action to Preview in Firefox.
Select the browser tab to return to your NETLAB+ lab session. It may be necessary to reload the browser page and re-select the Content tab. The content should now be displayed.
[]Status Tab
The status of all devices in the pod is displayed on the Status tab.
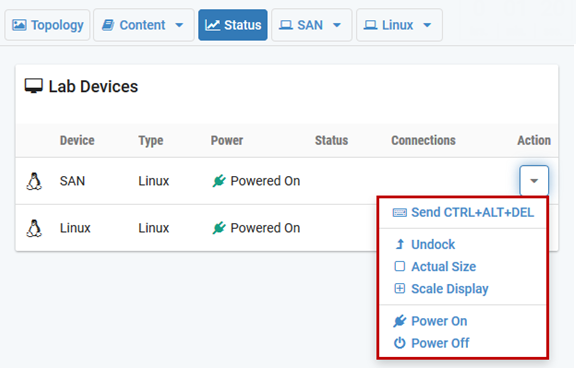
NETLAB+ provides several options for managing devices (options available vary by device), which may be accessed by clicking on the Action dropdown:
Send CTRL+ALT+DEL: Simulate the action of pressing CTRL+ALT+DEL on the device.
Undock: Access to the device is made available in a separate, floating window, allowing you to position and arrange windows to suit your needs. (for details, see the Undock and Dock Device Windows section.
Actual Size, Scale Display: Options to adjust the size of the output displayed in the window, relative to the size of the viewer window.
Power on, Power Off: Options to toggle the power of the device.
[]Access a Device
In this section, we will illustrate the process of accessing one of the devices in the pod, starting from the Topology tab. For this example, we will use a Multi-purpose Academy Pod (MAP).
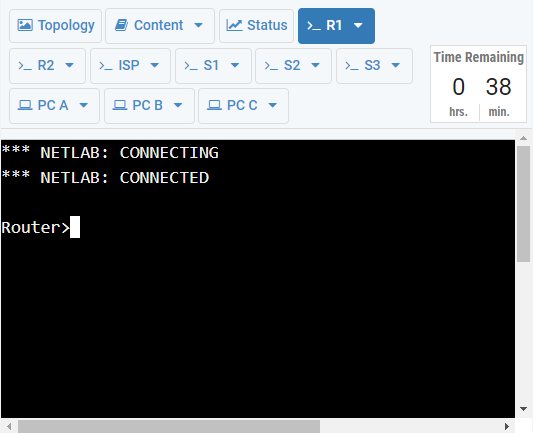
Access the R1 router by clicking the icon on the topology diagram or by clicking on the R1 device tab.
The active tab will change to the R1 tab, and the R1 router will be displayed in the viewer. You may interact with the device as if you were accessing it directly, including entering credentials (typically provided in content) and entering commands.
As we saw in the Status Tab, NETLAB+ provides several options for managing devices, which may also be accessed by clicking on the currently selected device name tab (R1, in this example).
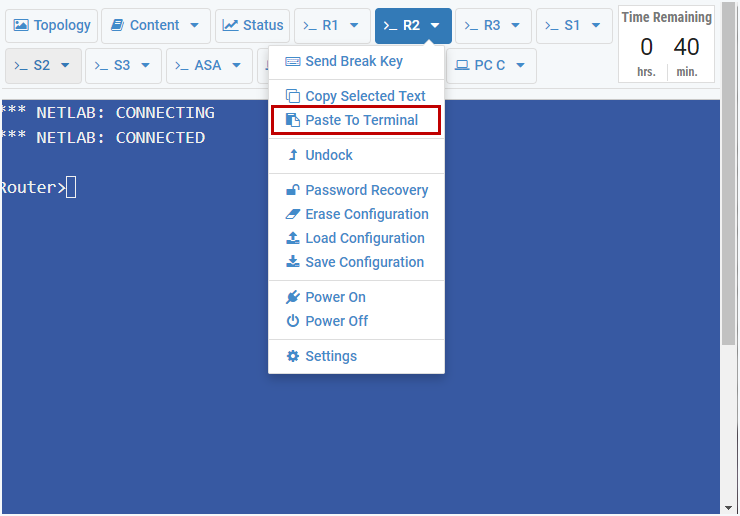
Options available on specific devices may vary; typical choices for routers (as in this example) include:
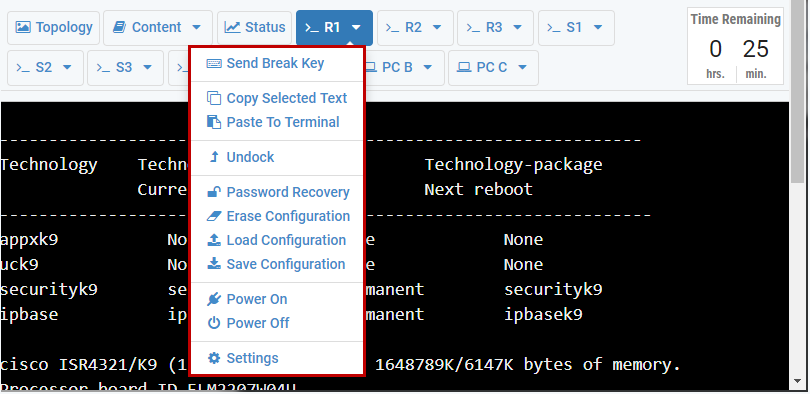
Send Break Key: Simulate the action of the Break Key sequence on the device.
Copy Selected Text: Copy selected text to the clipboard. See the Copy Selected Text subsection below.
Paste to Terminal: Paste configuration text to a device’s terminal (see Paste to Terminal).
Undock: Access to the device is made available in a separate, floating window, allowing you to position and arrange windows to suit your needs (see the Undock and Dock Device Windows subsection below).
Password Recovery: Unlock the console and enable passwords on a device. See the Password Recovery subsection below.
Erase, Load, and Save Configurations: If you are accessing console-based devices such as Cisco routers, switches, and firewalls, you will see additional options to erase, load, and save configurations.
Power on, Power Off: Options to toggle the power of the device.
Settings: Custom terminal styles allow you to select the background color, text color, and font size for your device. Styles are saved and used in all future labs using the same pod type. Please see the Terminal Settings section below for details.
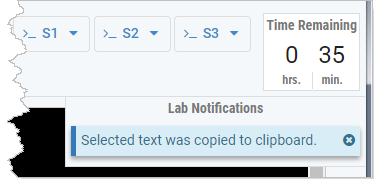
[] Copy Selected Text
To copy text from the terminal to the clipboard, perform the following steps.
Select the text by holding down the left mouse button and dragging the mouse pointer to highlight the text.
Click the Copy Selected Text option on the device tab.
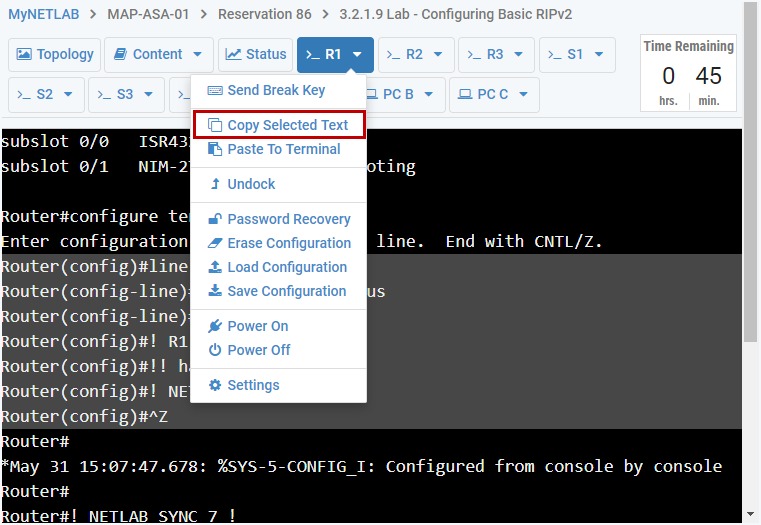
Notice a lab notification message will briefly display, confirming the selected text was copied to the clipboard. You may paste the text to the application of your choice. To paste into a typical Windows application, use CTRL+V or Right-click > Paste. Your options for pasting may vary, depending on your system selections and settings.
[] Paste to Terminal
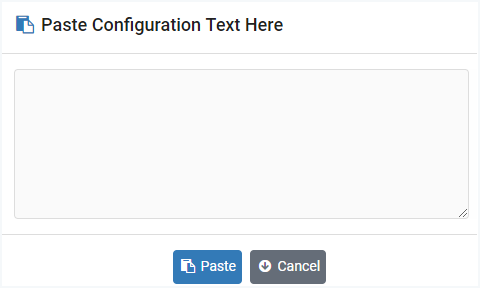
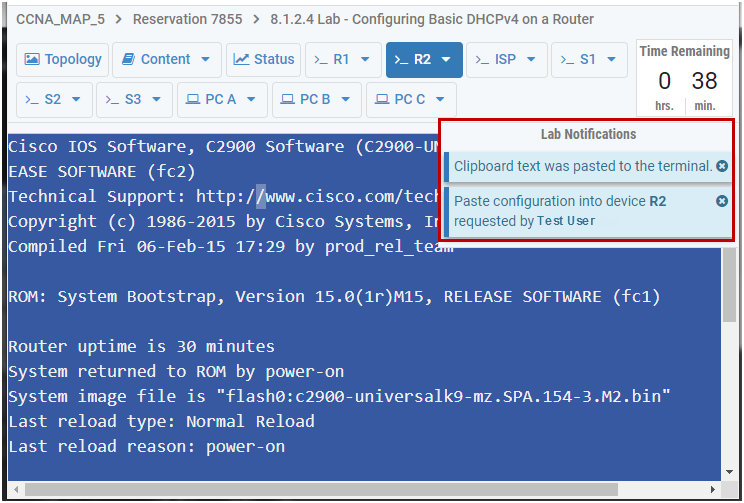
The Paste to Terminal option is used in order to paste configuration text to a device’s terminal.
Click the Paste To Terminal option on the device tab.
The Paste Configuration Text window will appear. You may paste configuration text copied from the application of your choice. To paste from the clipboard, Windows users can typically use CTRL+V or Right-click > Paste. Your options for pasting may vary, depending on your system selections and settings. While the text window is not designed to be a fully functioning text editor, the basic utility to type and edit configuration text in the window is provided.
Click Paste to paste the text you placed in the window to the device’s terminal.
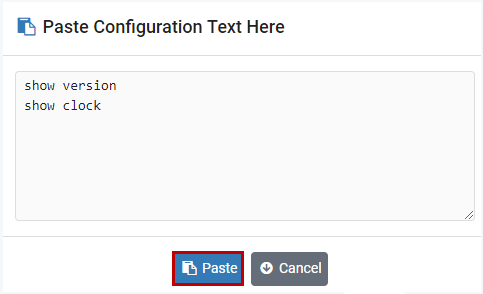
Lab notifications will be displayed, indicating that the configuration text was pasted to the device by the user. The terminal will show the resulting output.
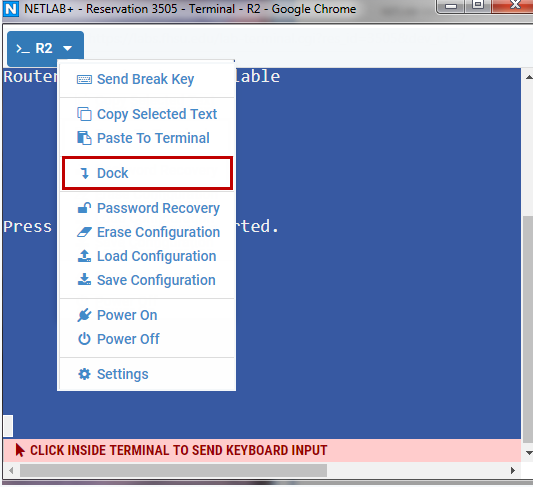
[] Undock and Dock Device Windows
You may find it helpful when organizing your workspace to have the terminal windows for several devices arranged so that you may conveniently view and easily access all of them. You may Undock any lab device to have the terminal displayed in its own window.
From the lab device tab (R1, in this example), select the option to Undock the device display.
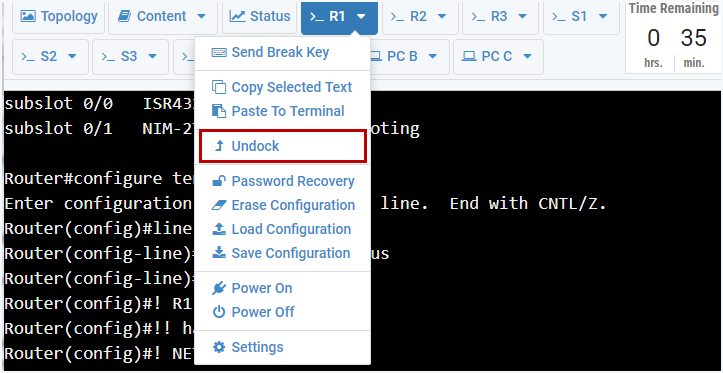
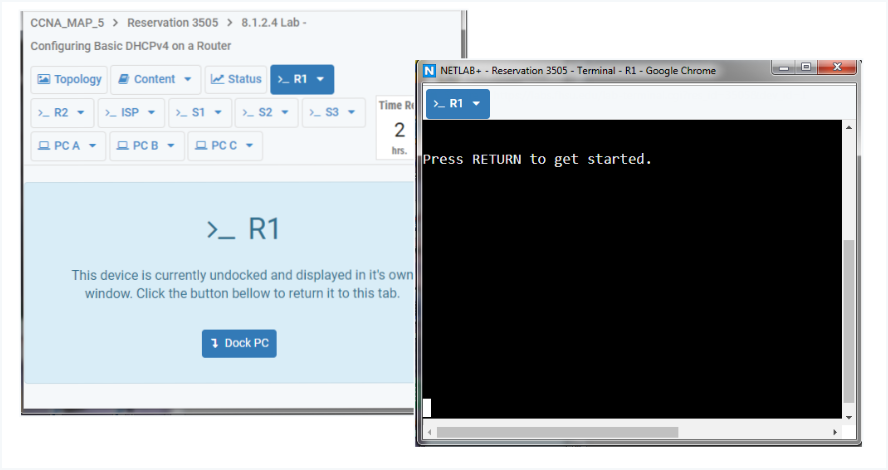
The R1 device tab indicates the device is currently undocked and displayed in its own window. You may move and resize the R1 window to suit your needs.
Select the option to undock the R2 device. Notice the background color of R2 is different from R1, allowing you to distinguish between the windows easily.
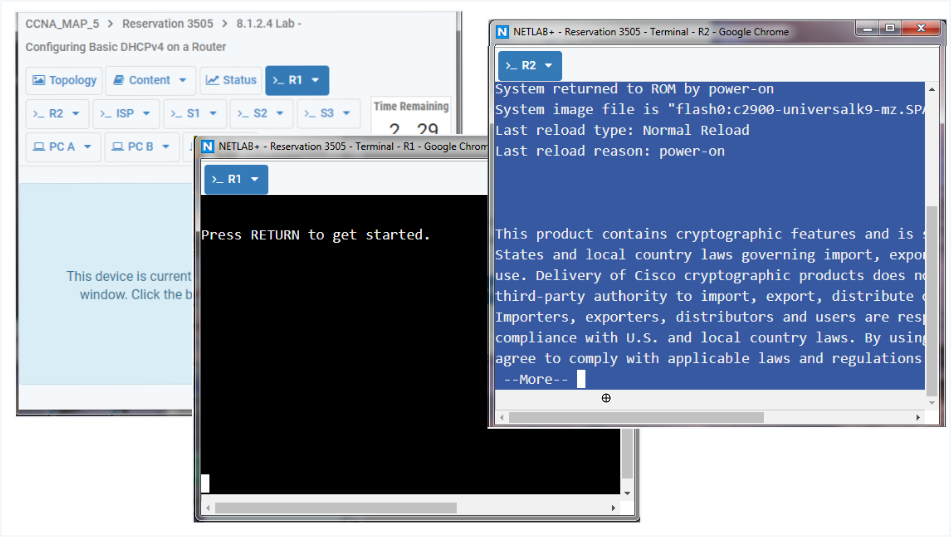
To dock the terminal display back to the device tab, select the Dock option on the device window.
[]
Password Recovery
The password recovery option will attempt to remove the console and enable passwords from the device.
Select the Password Recovery option on the device tab.
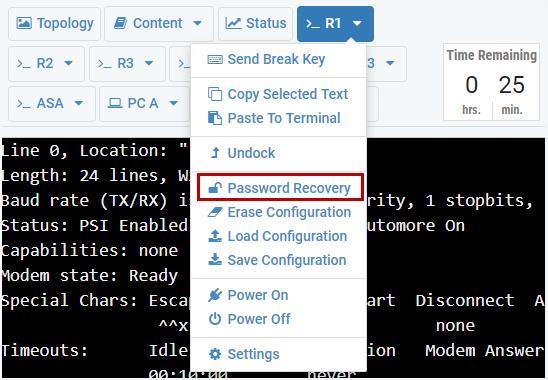
Select Yes to confirm that you want to unlock the passwords for the device.
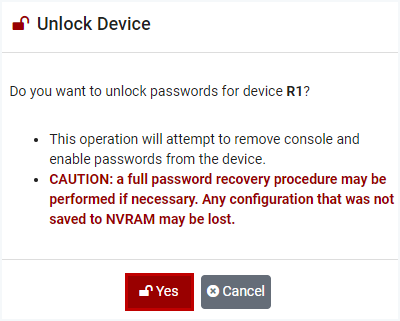
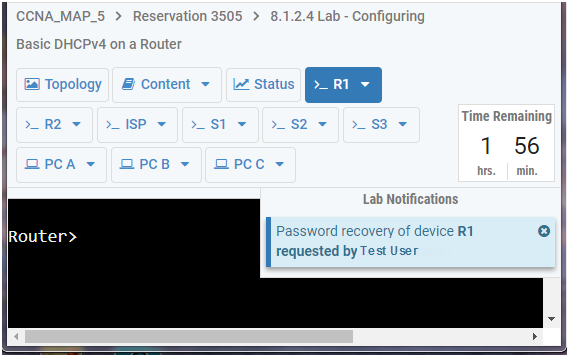
A lab notification message will be displayed, indicating that password recovery has been requested.
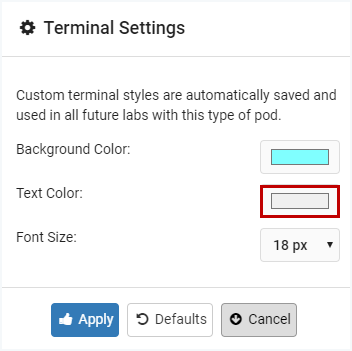
[] Terminal Settings
Customize the appearance of your device’s terminal by selecting settings for background color, text color, and font size.
Select the Settings option on the device tab.

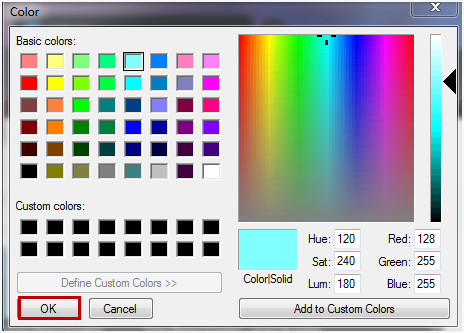
The Terminal Settings popup window will be displayed. To change the background color of the terminal, click the rectangle displaying the current background color.

A color selection window will appear. You may select a basic or custom color for the background of your CLI viewer. In this example, we will select one of the basic colors. After selecting a color, click OK.
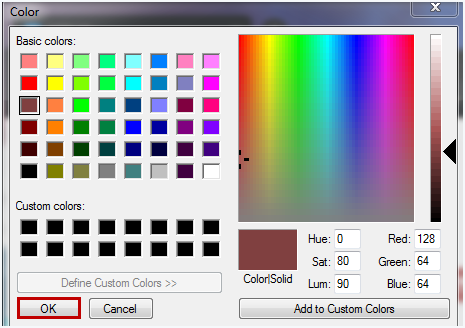
To change the text color, click the rectangle displaying the current text color.
A color selection window will appear; you may select a basic or custom text color and then click OK.
To change the font size, click the dropdown showing the current font size and select the font size of your choice.

To apply your selections and exit the Terminals Settings window, click Apply.
Your settings will be saved and used for future reservations using the same type of pod. You may return to the default settings by selecting Defaults on the terminal settings window.

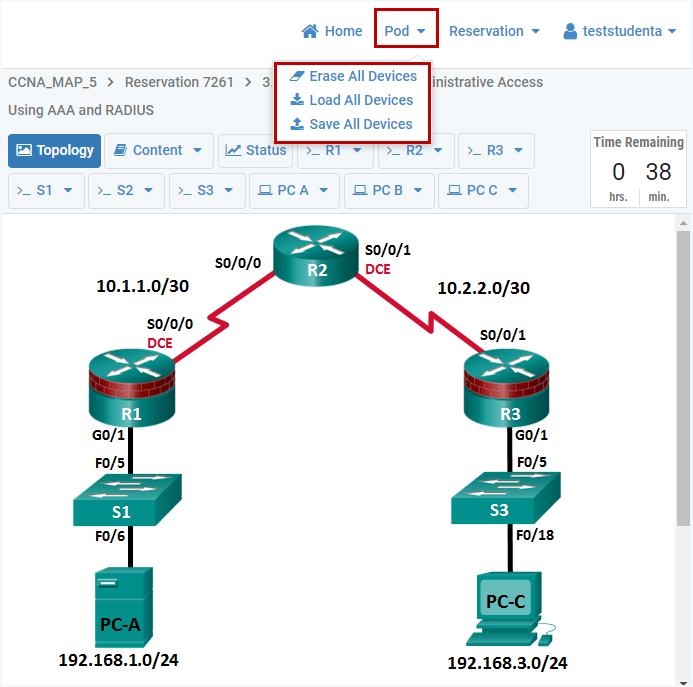
[]Pod-wide Device Automation
Lab reservations using pods with lab devices (console-based devices such as Cisco routers, switches, and firewall devices) include the Pod menu option on the lab interface. The pod options allow all the configurations of all lab devices in the pod to be erased, loaded, or saved at once.
Select the Pod menu option on the lab interface.
Select an option to either Erase, Load, or Save the configurations of all of the lab devices in the pod. Please see the Manage Configuration Files section for details on using and managing configuration files.
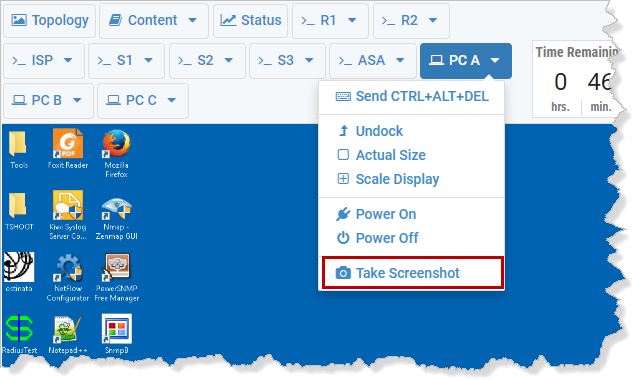
[]Screenshots of Remote PCs
In this section, we will demonstrate the Screenshot feature, which allows users to take screenshots of remote PCs in the topology during a lab session. These screenshots are included in the lab history where you can View Completed Labs.
To take a screenshot, perform the following steps:
Click on the tab for the remote pc (PC A, in this example) and select the Take Screenshot option.
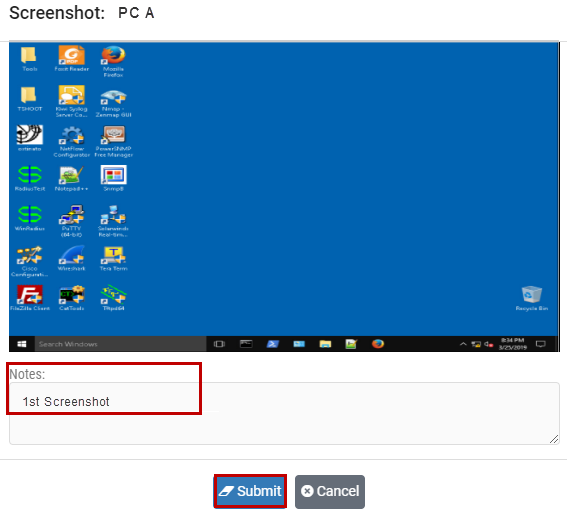
The screenshot popup page will appear, showing the screenshot that you have captured. Adding a brief description in the optional Notes field is recommended. Click Submit.
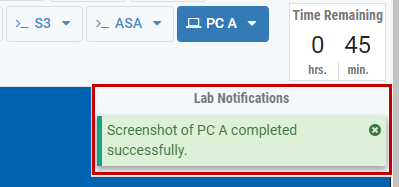
A lab notification will briefly appear, showing that the screenshot was completed successfully. You may continue to take screenshots of the remote PCs throughout your lab session. The screenshots will be included as part of the lab history, available to view from the View menu option. See the View Completed Labs section for details.
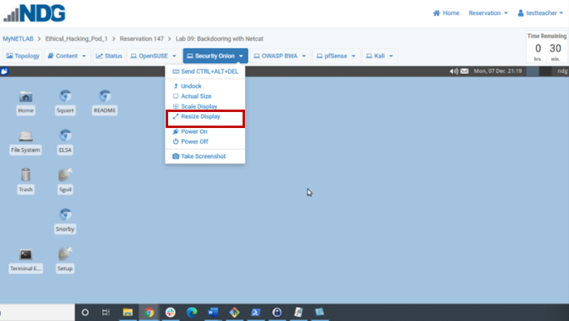
[]Display Sizing Options for Remote PCs
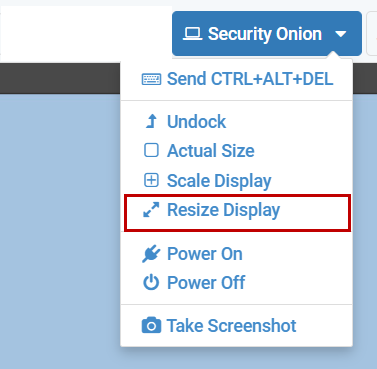
Resize Display is particularly helpful to use after entering full-screen mode (select F11 if using Windows) since it will enable you to make use of the entire screen’s “real estate” as the working area.
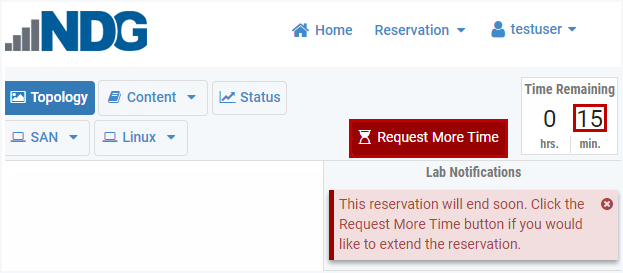
[] Extend a Reservation
The option to extend a reservation allows the user to request 30 additional minutes of lab time. The request to extend a reservation may be made by the user when the Time Remaining in the lab interface shows 15 minutes or less.
To request a reservation extension, perform the following steps:
If a reservation extension is available, the option to Request More Time will appear when the time remaining in the lab interface shows 15 minutes or less.
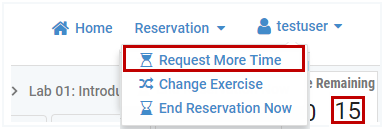
Alternatively, the option to request more time is available by selecting Reservation > Request More Time.
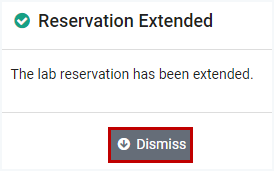
A confirmation message will indicate the lab reservation has been extended. Click Dismiss.
Restrictions for All Users
An extension cannot be made before T-00:15 on the displayed Time Remaining. This is about 26 minutes from the blocked end time and 16 minutes of the usable time remaining.
The next 30-minute time slot must not be already scheduled by another reservation.
The extension cannot exceed the maximum pods in use limit and/or proactive resource awareness settings that have been set by the NETLAB+ Administrator.
Restrictions for Students and Teams
The number of extensions that a student or team can request is limited by community and class settings.
For backward setting compatibility, communities and classes do not allow extensions to be made by students or teams by default.
The Administrator must specifically allow extensions for students and teams per community.
The instructor must specifically allow extensions for students and teams per class.
A learner may not extend an ILT reservation. Only a lead instructor can extend an ILT reservation.
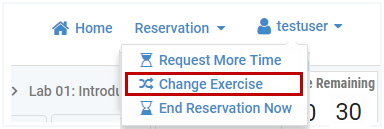
[]Switch to a Different Lab Exercise
If you have completed all the activity associated with the current lab exercise, you may choose to continue your session using a different lab exercise.
Click Reservation on the top menu bar and select the option to Change Exercise.
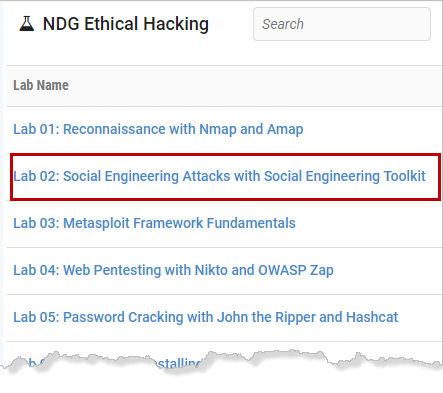
A list of lab exercises associated with the class will be displayed. Select a lab exercise by clicking the lab name.
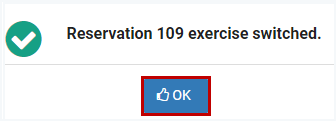
A message will confirm that the lab exercise has been switched. Click OK.
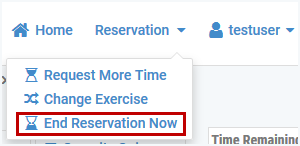
[]End a Reservation
When a lab reservation time expires, all connections will be dropped. A reservation may also be ended prior to the scheduled time.
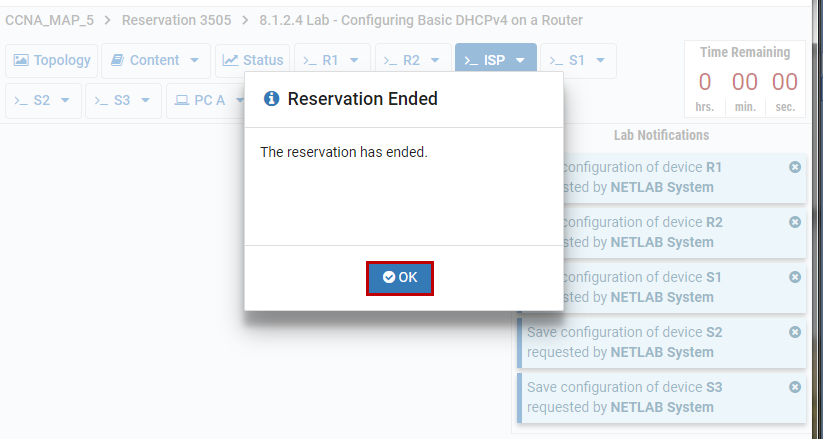
Select Reservation at the top of the page and click End Reservation Now.
Respond Yes to the prompt if you are finished with the pod. (Or, select No to return to the pod.)

A message will display, indicating the reservation has ended. A similar message is displayed if the reservation ends at the scheduled end time. Notice the lab notification messages in the background, indicating device configurations are being saved. The lab session will end immediately. Select OK, and your display will return to the MyNETLAB page.
The scheduler will be updated to include any unused time increments of thirty minutes or more to be available for reservations.
`
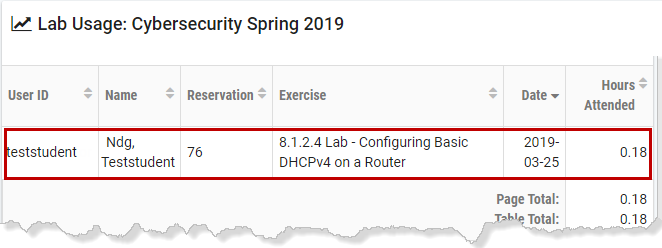
[] View Completed Labs
To review details of the lab reservations you have completed in NETLAB+, perform the following steps.
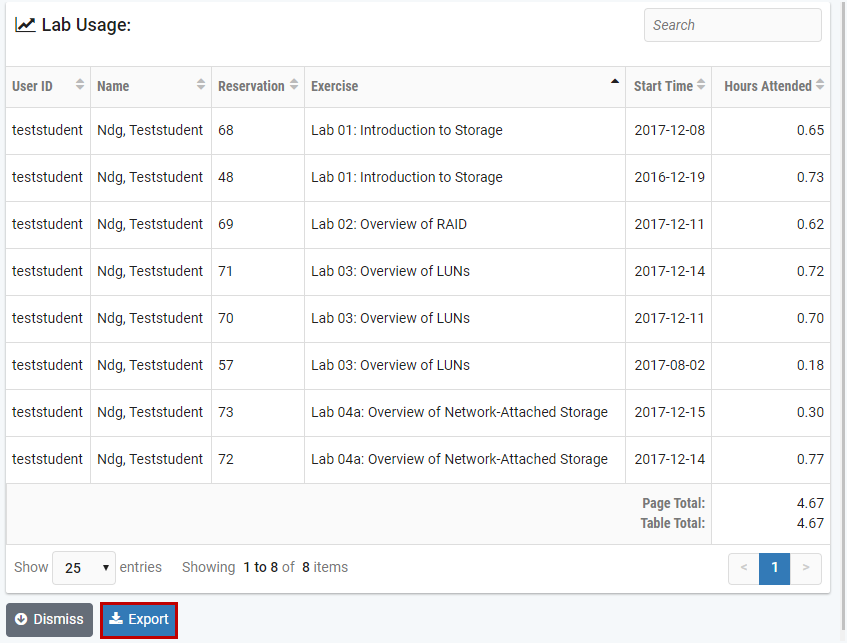
From the MyNETLAB home page, click the View option and select Completed Labs.

A list of the labs you have completed is displayed. You may sort the data in ascending/descending order by clicking any of the header fields. In the example below, the data is sorted by Exercise. You have the option of exporting this data by selecting Export.
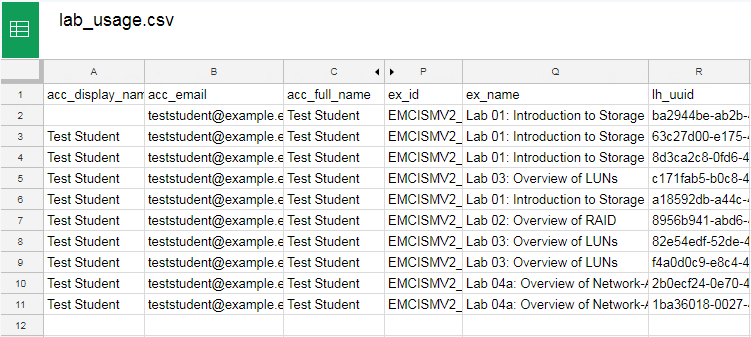
The data has been exported to a file, lab_usage.csv. Locate the file in your computer’s downloads folder (the folder name may vary depending on your preferences and settings). The file can be viewed with a spreadsheet program or text editor.
To see more detail of any reservation on the Lab Usage list, click any of the detail rows. We’ll discuss lab history in the next section. Click Dismiss to return to the previous page.
[]Lab History and Screenshots
In the previous section, we discussed how to view a list of labs you have completed. We will now take a look at lab history details.
To see the lab history for a reservation listed, click on a reservation detail row.
The Lab History Summary tab will be displayed, showing details specific to the reservation.
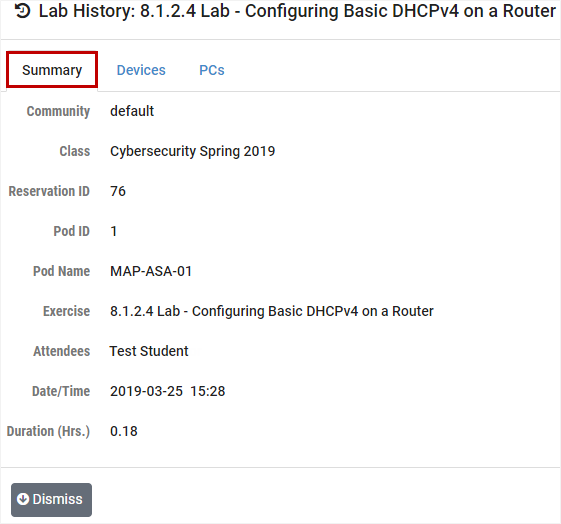
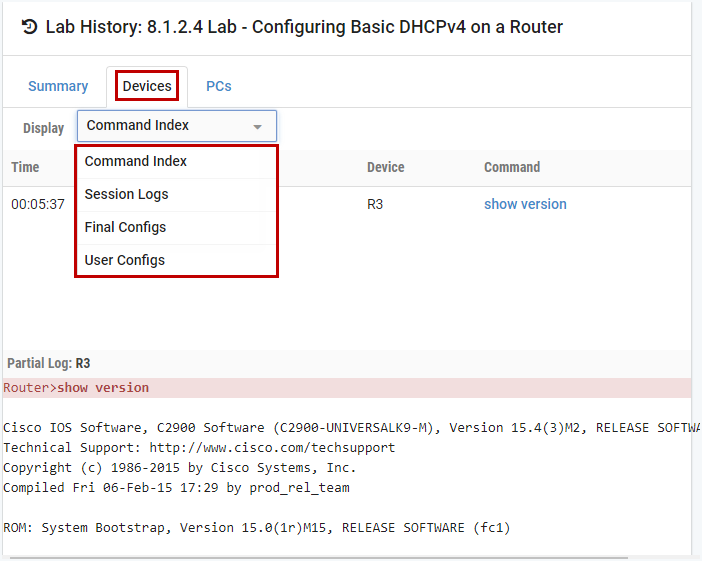
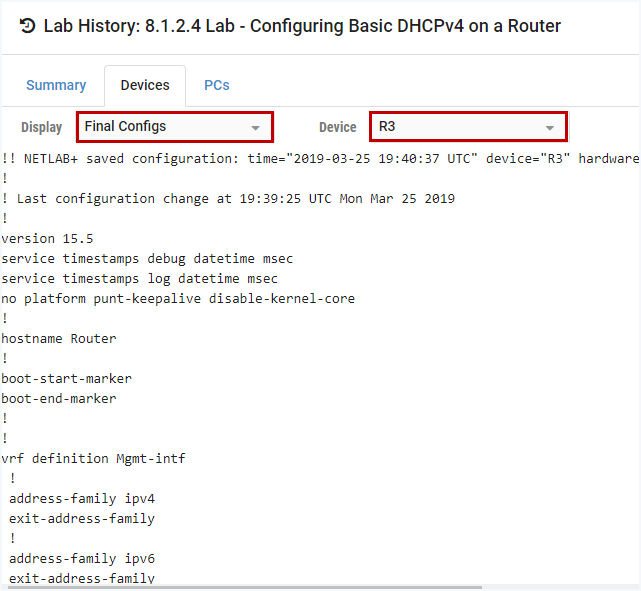
If the lab topology includes lab devices (physical devices, such as routers and switches), you will find details of your interaction with those devices on the Devices tab. The display options are listed below. Click Dismiss to return to the lab list (it may be necessary to scroll down if you are on the Devices tab).
Display Options on the Devices Tab
Command Index: A listing of the commands entered during the lab.
Session Logs: A log of the activity occurring on the selected device.
Final Configs: The configuration file saved by NETLAB+ at the end of the lab session for the selected device.
User Configs: Configuration files saved by the user during the lab session for the selected device.
Here, the Command Index has been selected.
In the example below, the Final Configs for device R3 are displayed.
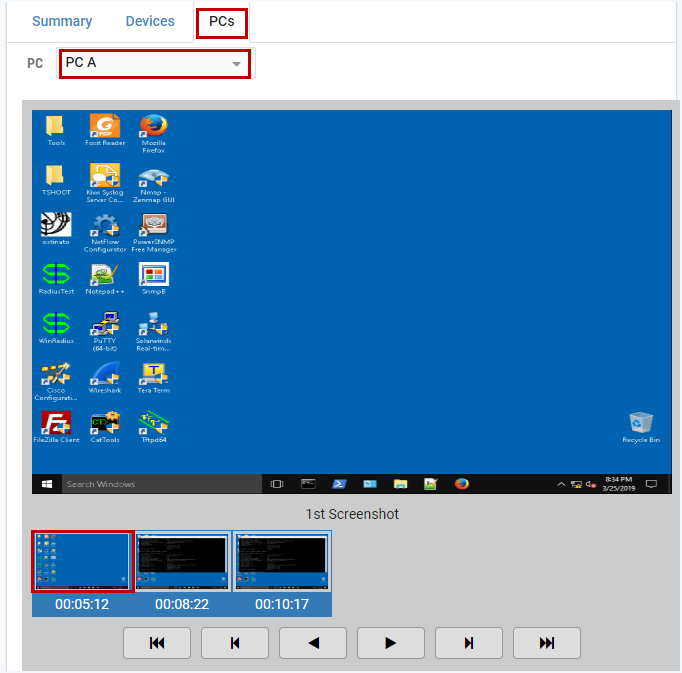
If the lab topology includes PCs, click on the PCs tab to view any screenshots of remote PCs that were captured during the lab session. If more than one PC is included in the topology, select a device on the dropdown (for example, PC A is selected below). Thumbnail images are displayed at the bottom of the page. Click on any thumbnail to display the screenshot. You may also scroll through the screenshots using the button controls below the thumbnails.
[] Manage Configuration Files
 The File Manager is used to view, add,
change, or delete configuration files and folders. NETLAB+ can upload
and download configuration files to console-based devices such as
routers, switches, and firewall devices in the lab. These files are
stored in the NETLAB+ file system. The NETLAB+ file manager provides
access to files and folders.
The File Manager is used to view, add,
change, or delete configuration files and folders. NETLAB+ can upload
and download configuration files to console-based devices such as
routers, switches, and firewall devices in the lab. These files are
stored in the NETLAB+ file system. The NETLAB+ file manager provides
access to files and folders.
Files contain the actual device configurations.
Folders may contain other folders and configuration files. Folders may be either class (shared) folders or account (specific to the user) folders.
The files in the class-shared folder may be accessed by the students enrolled in the class. Students may view files, copy files, and load devices with configuration files and folders. Students do not have access to add, edit, or delete items in the class-shared folder.
Account folders may be accessed by the user or by the NETLAB+ Administrator.
[]Configuration File Management Outside of a Lab Reservation
Using the File Manager, you can create and edit configuration files and folders. You may find it useful to create a configuration file outside of a lab reservation when you want to practice your router commands or create files to use in later sessions. These files can be created/edited whether or not you have access to a router pod. These configuration files can be saved and later applied to one or more routers in the topology during a lab session.
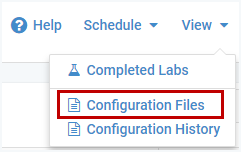
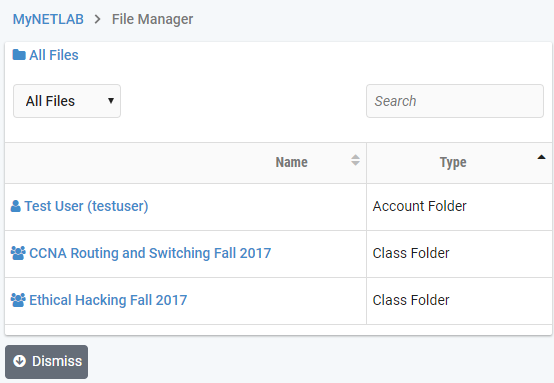
From the MyNETLAB home page, click the View option and select Configuration Files.
A list of folders will be displayed. Notice the list includes an account folder and a class folder for each class in which you are enrolled. In the subsections below, we will show examples of editing a configuration file and creating configuration files and folders.
[]Viewing and Editing Configuration Files
Configuration files may be viewed and edited outside of a lab reservation. Your file can be saved and later applied to one or more lab devices in the topology during a lab session. For the purpose of this example, we assume that the configuration files and folders referenced have been created during a recent lab session (see Saving Configuration Files During a Lab Reservation).
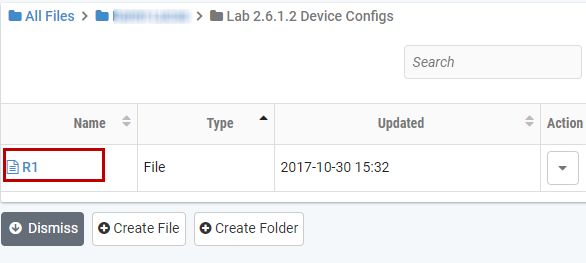
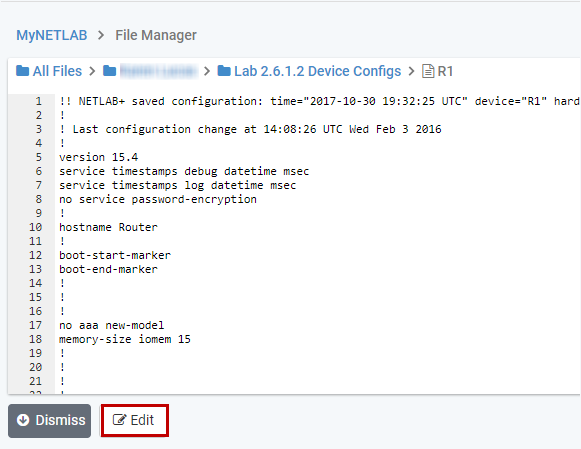
Select the Lab 2.5.1.2 Device Configs folder and then click the R1 file to open it.
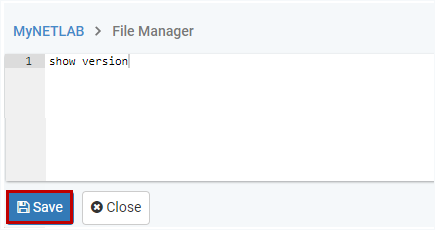
The R1 file is displayed. For this example, we will not only view the file but also edit it. Click the Edit button.
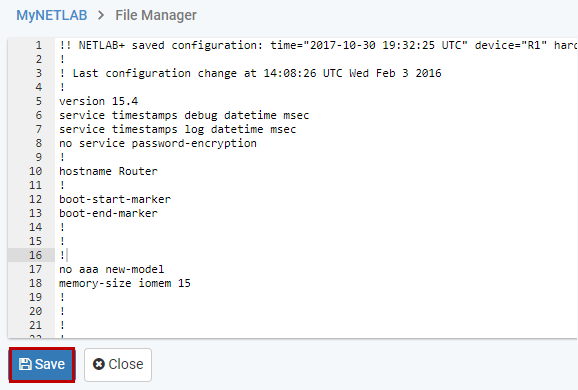
Click inside the window and edit the file as desired. Select Save to save the modified version.
[]Creating Folders and Files
Configuration files and folders may be created outside of a lab reservation. Your files can be saved and later applied to one or more lab devices in the topology during a lab session.
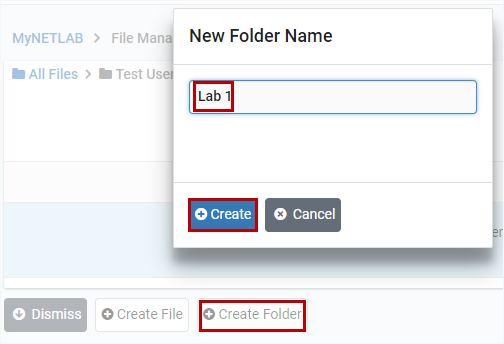
In this example, we will be creating a folder and configuration file in Test User’s account folder. To create a subfolder for your file, select Create Folder, enter a folder name, and then select Create.
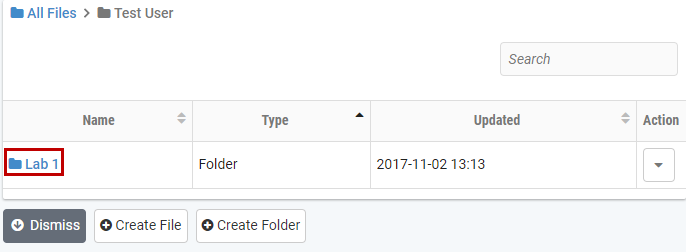
The Lab 1 folder will be displayed in the folder list. Click the folder name to select it as the current folder.
Select the Create File button, enter a file name, and then click Create.
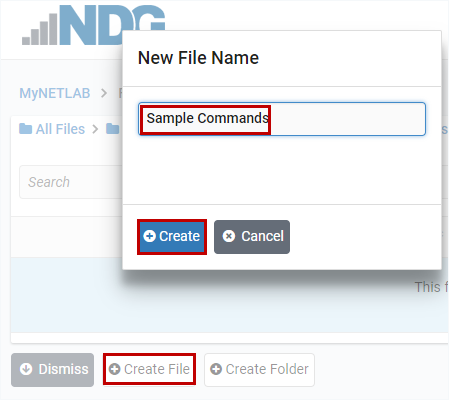
After entering CLI commands, select Save to store the configuration file.
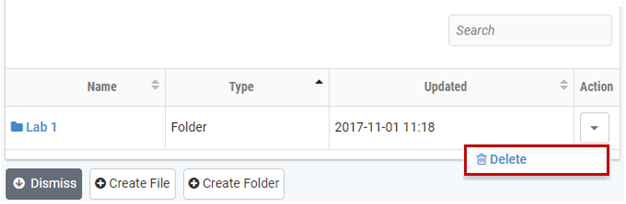
[]Deleting Folders and Files
To delete a file or folder in the current directory, click the Action dropdown and select Delete.
[]Configuration History
Configuration files for all lab devices in a topology are saved automatically by NETLAB+ at the end of a lab reservation, creating a saved “history”. The files are stored in a folder named for the lab exercise. You may view these configuration files outside of a lab reservation.
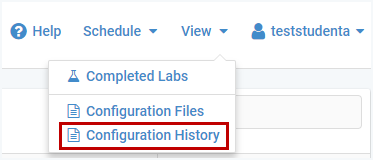
From the MyNETLAB home page, click the Manage option and select Configuration History.
The History Manager will be displayed. Select the account folder.
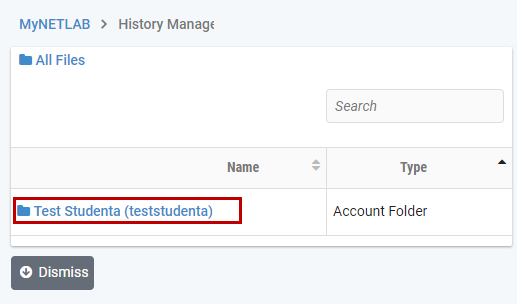
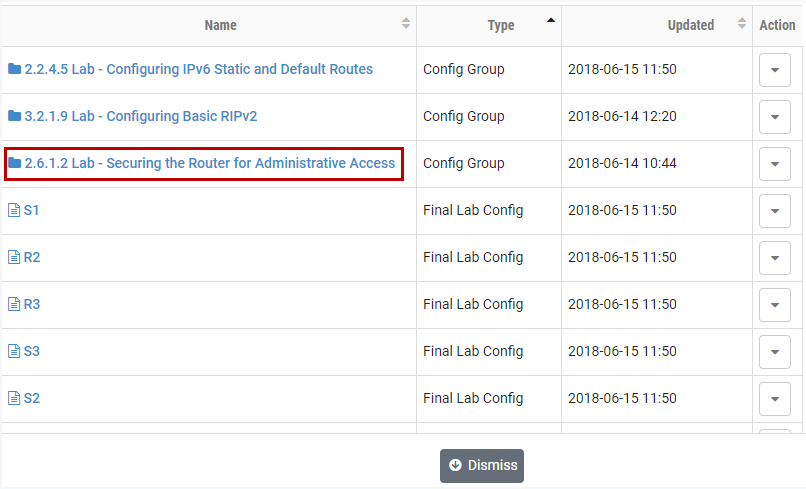
You will see Config Group folders that contain configuration files that were automatically saved by NETLAB+ at the end of each lab reservation. Select a folder by clicking on the name. In this example, we select the folder from a reservation completed on 2018-06-20, lab exercise 2.6.1.2 (CCNA Security).
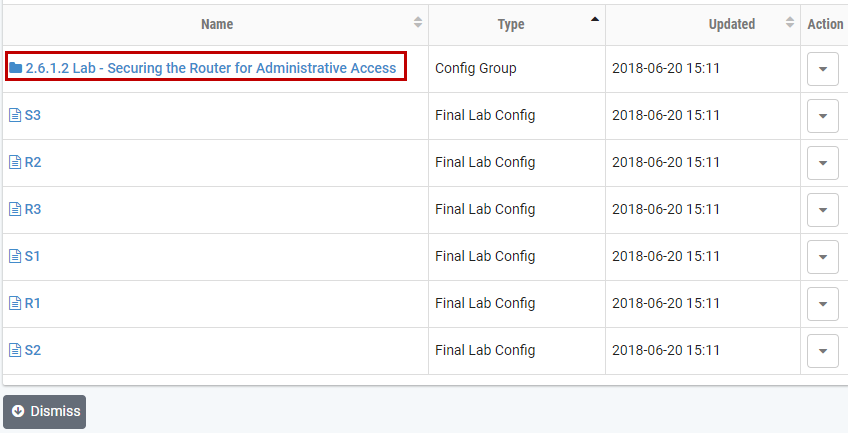
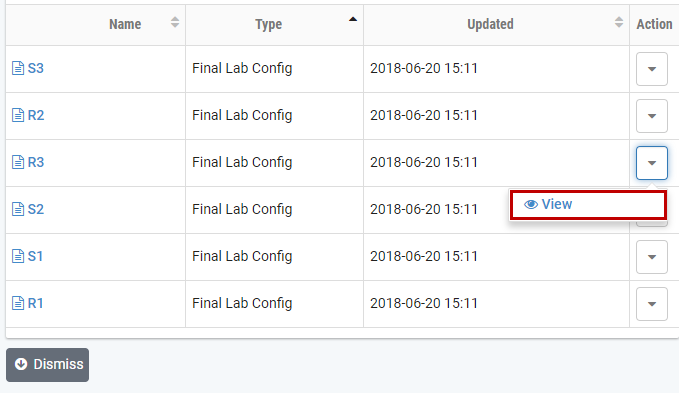
The configuration files saved at the end of the lab reservation for each device in the lab topology are listed (file type is Final Lab Config). You may View any file by selecting the option on the Action dropdown.
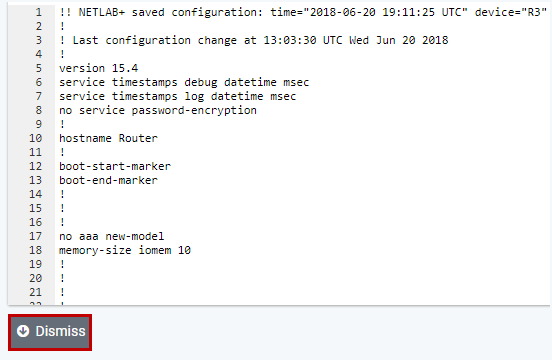
The configuration file is displayed. When you are finished viewing the file, click Dismiss.
[]Configuration File Usage During Lab Reservations
In the subsections below, we will show how to save, load, and erase configuration files during a lab reservation. To illustrate these processes, we have created a lab reservation on a Multi-purpose Academy Pod (MAP). The MAP includes 3 routers and 3 switches.
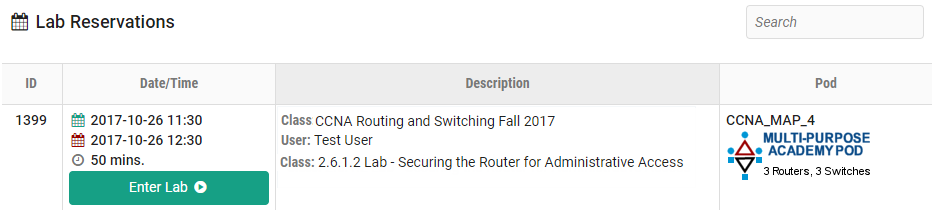
[] Saving Configuration Files During a Lab Reservation
When saving a configuration, NETLAB+ captures the output from the ‘show running’ or equivalent commands.
To save a configuration file during a lab reservation, select the device (R1 in this example). Click the R1 button again to display the dropdown menu and select the option to Save Configuration.
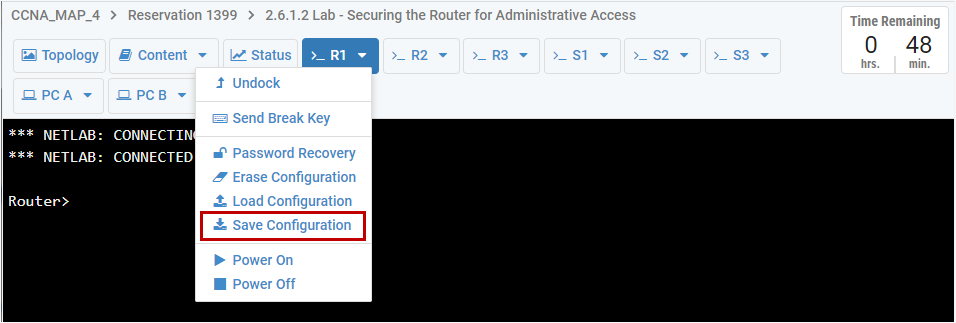
You have the option to create a subfolder for your file(s), which can be helpful in keeping your files organized. Here, we’ll create a folder for device configuration files for this lab by selecting Create Folder, entering a folder name, and then selecting Create.

Click the name of the new folder to select it as the current folder. Select the option to Save Here. The popup box will show the default file name as R1 since we are saving the configuration of the R1 device. Click Create. The file will be saved in the Lab 2.6.1.2 Device Configs folder.
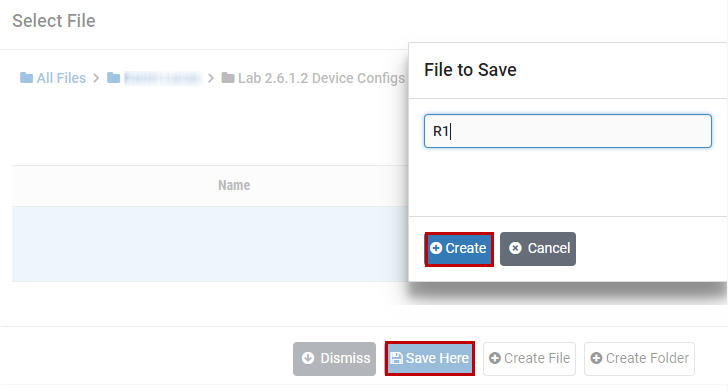
[]Loading Configuration Files During a Lab Reservation
When loading a configuration into a device, NETLAB+ will enter configuration mode and send each line of the configuration file as if you had typed it manually.
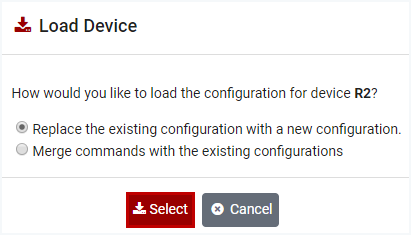
To load a configuration file during a lab reservation, select the device (R1 in this example). Click the R1 button again to display the dropdown menu and select the option to Load Configuration.
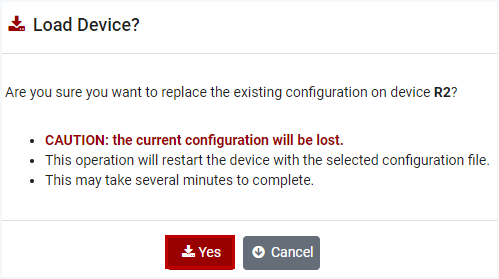
The Load Device popup window will be displayed. You may choose to replace the existing configuration or merge commands with the existing configuration on the device. For this example, we will choose Replace the existing configuration with a new configuration and click the Select button.
Confirm your choice to replace the existing configuration on the device by selecting Yes.
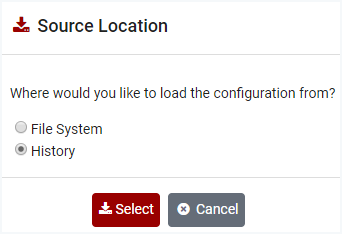
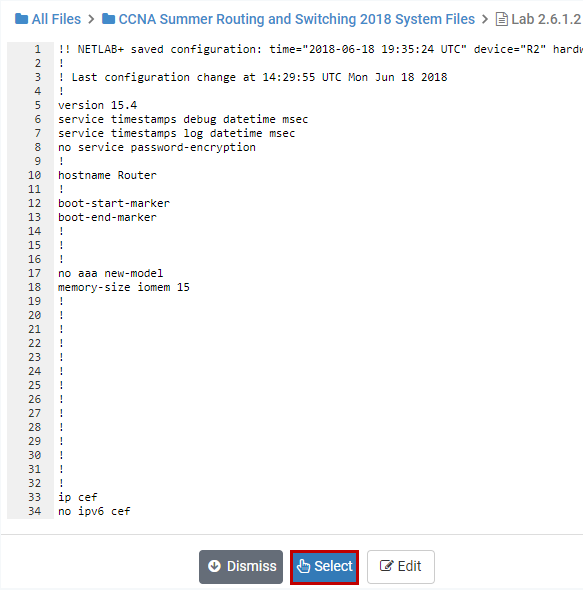
Select the source location of the configuration file. For this example, we will select History, which will allow us to use a configuration file saved from a previous lab session.
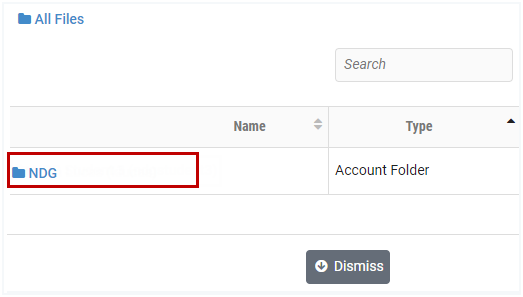
Select the account folder by clicking the folder name.
The Select File page will be displayed. You will see Config Group folders that contain configuration files that were automatically saved by NETLAB+ during previous lab reservations. Select a folder by clicking on the name. In this example, we select the folder from a reservation completed on 2018-06-14, lab exercise 2.6.1.2 (CCNA Security).
The configuration files saved at the end of the lab reservation for each device in the lab topology are listed (file type is Final Lab Config). You may View any file by selecting the option on the Action dropdown.
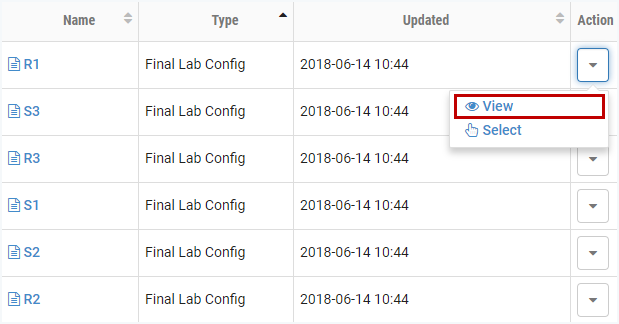
The configuration file is displayed. You may choose to load this file on the device by clicking the Select button.

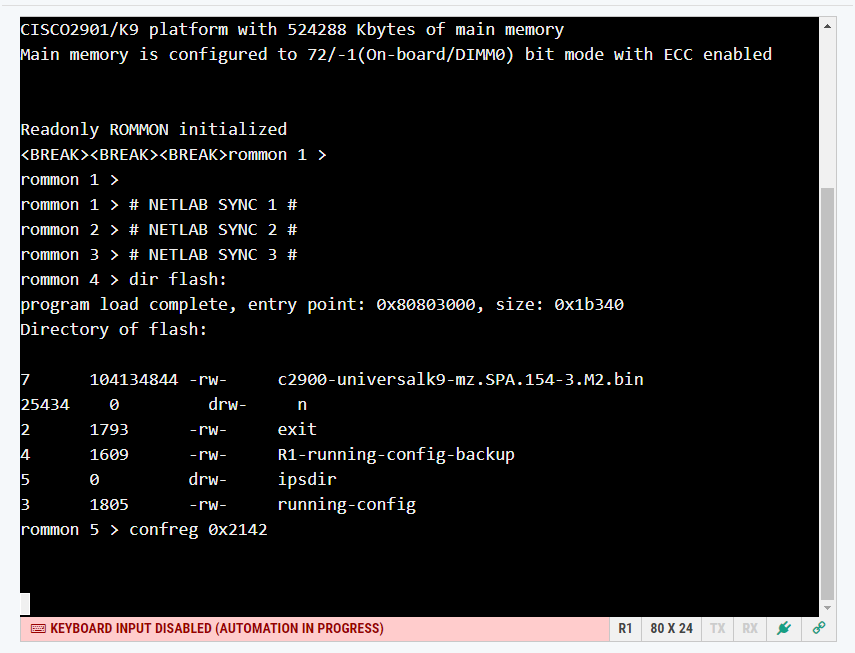
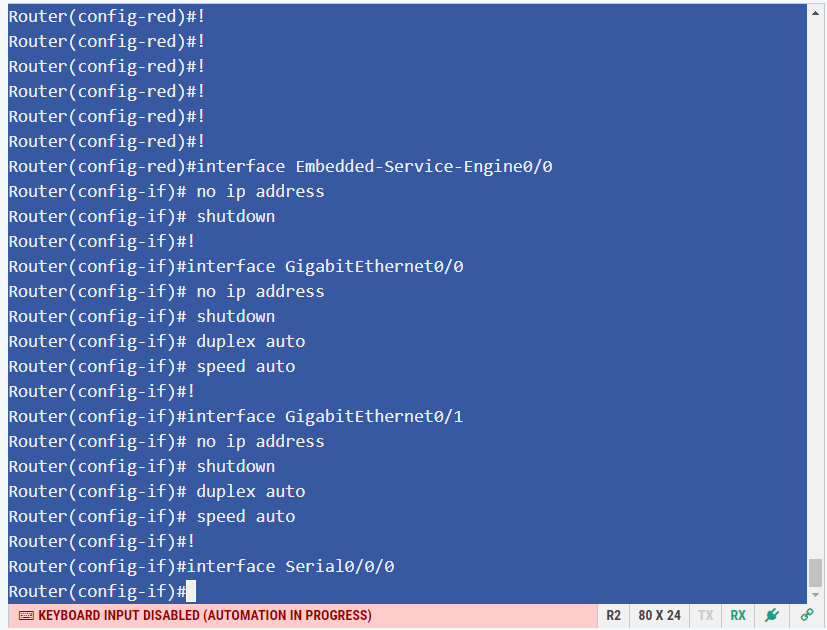
You will see the configuration loading. Keyboard input will be disabled while the automation is in progress.
Next, we will load a configuration file into device R2. To load a configuration file during a lab reservation, select the device (R2 in this example). Click the R2 button again to display the dropdown menu and select the option to Load Configuration.
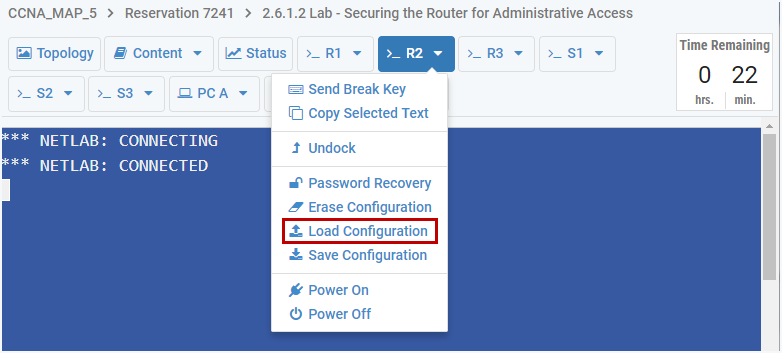
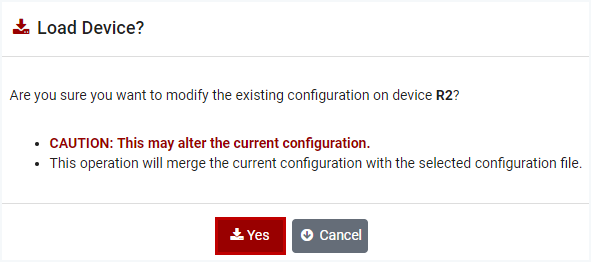
To load a configuration file without erasing the current configuration on a device, select the option to Merge commands with the existing configurations.
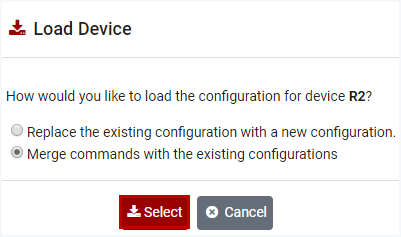
Confirm your intention to modify the existing configuration by clicking the Yes button.
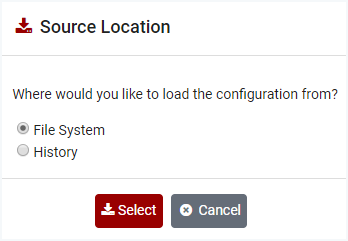
For this example, we will use a file that was saved during a previous lab reservation. Select the option to load a configuration from the File System.
The Select File page will be displayed. The list of files/folders includes class and account folders. Select a folder by clicking on the folder name.

The class folder in this example contains a file that was previously saved by the class instructor. To view the file, click the file name.
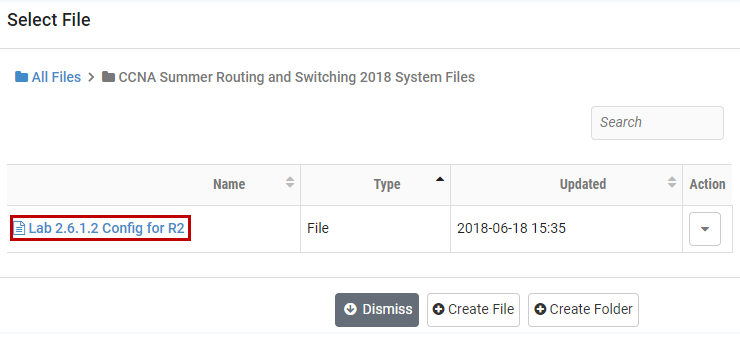
The configuration file will be displayed. Click Select to load the file.
You will see the configuration loading. Keyboard input will be disabled while the automation is in progress.
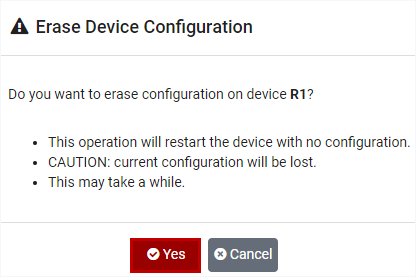
[]Erasing the Configuration on a Device During a Lab Reservation
To erase the configuration on a device during a lab reservation, select the device (R1 in this example). Click the R1 button again to display the dropdown menu and select the option to Erase Configuration.

A warning message will be displayed. Select Yes to confirm that you want to erase the configuration.